 David
David 
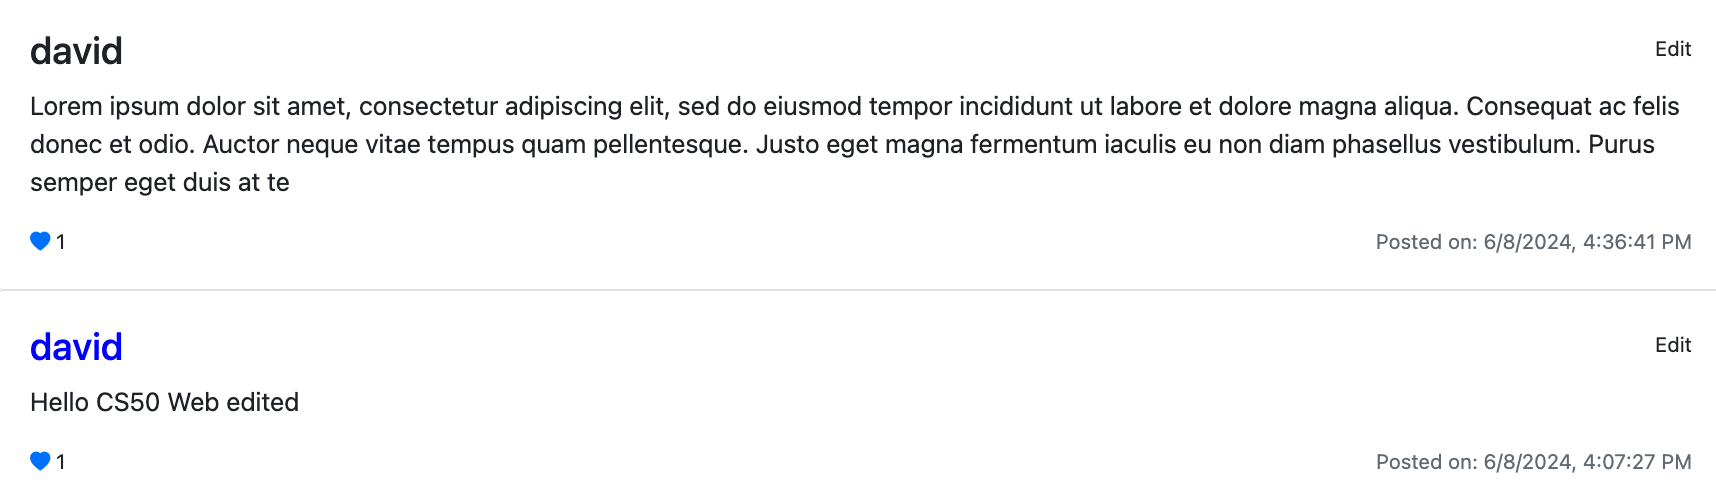
Mail is an email application developed using the Django framework. The core functionality of this project, however, is driven by JavaScript (JS). JavaScript was employed to build most of the features of the site, integrating with an API that allows users to send, receive, and manage emails. Emails can be marked as read or unread and can be archived or unarchived. This functionality was supported by HTML and CSS to create a user-friendly interface, and use JS functionality.
Mail in Action
Discover the capabilities of Mail through this video presentation:
Personal Insights
The project leveraged Django’s models, admin interface, and other robust features alongside JavaScript (JS), HTML, CSS, and Bootstrap for styling to create a web application. Here are some interesting snippets and explanations of how JavaScript was utilized:
// Toggle views between composing an email and viewing emails
document.querySelector('#emails-view').style.display = 'none';
document.querySelector('#compose-view').style.display = 'block';

// Prevent form submission to the backend, handle via JS and API
document.querySelector('form').onsubmit = function() {
    ...
    // Prevent form submission which can cause undesirable results
    return false;
}

// Enhance readability of email body text
body = body.replace(/---/g, "<hr>");  // Replaces '---' with a horizontal rule
body = body.replace(/\n\n/g, "<br><br>");  // Converts double newlines to HTML breaks

// Populate fields and adjust layout when displaying an email
document.querySelector('#show-email').innerHTML = `
    <div class="card-header">
      <strong>From:</strong> ${sender}
      ...
    `

// Example of using 'append' to build content without overwriting
tr.innerHTML = mail;
tbody.append(tr);

// Clear previous emails from display to avoid duplication
document.querySelector('#emails').innerHTML = '';

// Using regex to determine if subject starts with "Re:"
let text = subject;
let pattern = /^Re:/;
if (pattern.test(text)) {
    document.querySelector('#compose-subject').value = `${subject}`;
} else {
    document.querySelector('#compose-subject').value = `Re: ${subject}`;
}

// Set up a reply by preloading the email composition form with sender and subject
document.querySelector('#reply').addEventListener('click', () => compose_email(sender, subject, body, timestamp));
These examples highlight practical uses of JavaScript for handling user interactions without server reloads, enhancing UI/UX by dynamically updating HTML content, and integrating with backend APIs to manage emails efficiently.
Specification for this project:
Using JavaScript, HTML, and CSS, complete the implementation of your single-page-app email client inside of inbox.js (and not additional or other files; for grading purposes, we’re only going to be considering inbox.js!). You must fulfill the following requirements:
Send Mail: When a user submits the email composition form, add JavaScript code to actually send the email.
- Make a
POSTrequest to/emails, passing in values for recipients, subject, and body. - Once the email has been sent, load the user’s sent mailbox.
Mailbox: When a user visits their Inbox, Sent mailbox, or Archive, load the appropriate mailbox.
- Make a
GETrequest to/emails/<mailbox>to request the emails for a particular mailbox. - When a mailbox is visited, the application should first query the API for the latest emails in that mailbox.
- When a mailbox is visited, the name of the mailbox should appear at the top of the page.
- Each email should then be rendered in its own box (e.g. as a
<div>with a border) that displays who the email is from, what the subject line is, and the timestamp of the email. - If the email is unread, it should appear with a white background. If the email has been read, it should appear with a gray background.
View Email: When a user clicks on an email, the user should be taken to a view where they see the content of that email.
- Make a
GETrequest to/emails/<email_id>to request the email. - The application should show the email’s sender, recipients, subject, timestamp, and body.
- Add an additional div to inbox.html (in addition to emails-view and compose-view) for displaying the email. Be sure to update your code to hide and show the right views when navigation options are clicked.
- Once the email has been clicked on, you should mark the email as read. Recall that you can send a
PUTrequest to/emails/<email_id>to update whether an email is read or not.
Archive and Unarchive: Allow users to archive and unarchive emails that they have received.
- When viewing an Inbox email, the user should be presented with a button that lets them archive the email. When viewing an Archive email, the user should be presented with a button that lets them unarchive the email. This requirement does not apply to emails in the Sent mailbox.
- Recall that you can send a
PUTrequest to/emails/<email_id>to mark an email as archived or unarchived. - Once an email has been archived or unarchived, load the user’s inbox.
Reply: Allow users to reply to an email.
- When viewing an email, the user should be presented with a “Reply” button that lets them reply to the email.
- When the user clicks the “Reply” button, they should be taken to the email composition form.
- Pre-fill the composition form with the recipient field set to whoever sent the original email.
- Pre-fill the subject line. If the original email had a subject line of
foo, the new subject line should beRe: foo. (If the subject line already begins withRe:, no need to add it again.) - Pre-fill the body of the email with a line like
"On Jan 1 2020, 12:00 AM foo@example.com wrote:"followed by the original text of the email.
API
GET /emails/<str:mailbox>
Sending a GET request to /emails/<mailbox> where <mailbox> is either inbox, sent, or archive will return back to you (in JSON form) a list of all emails in that mailbox, in reverse chronological order. For example, if you send a GET request to /emails/inbox, you might get a JSON response like the below (representing two emails):
[
    {
        "id": 100,
        "sender": "foo@example.com",
        "recipients": ["bar@example.com"],
        "subject": "Hello!",
        "body": "Hello, world!",
        "timestamp": "Jan 2 2020, 12:00 AM",
        "read": false,
        "archived": false
    },
    {
        "id": 95,
        "sender": "baz@example.com",
        "recipients": ["bar@example.com"],
        "subject": "Meeting Tomorrow",
        "body": "What time are we meeting?",
        "timestamp": "Jan 1 2020, 12:00 AM",
        "read": true,
        "archived": false
    }
]
GET /emails/<int:email_id>
Sending a GET request to /emails/email_id where email_id is an integer id for an email will return a JSON representation of the email, like the below:
{
    "id": 100,
    "sender": "foo@example.com",
    "recipients": ["bar@example.com"],
    "subject": "Hello!",
    "body": "Hello, world!",
    "timestamp": "Jan 2 2020, 12:00 AM",
    "read": false,
    "archived": false
}
POST /emails
To send an email, you can send a POST request to the /emails route. The route requires three pieces of data to be submitted: a recipients value (a comma-separated string of all users to send an email to), a subject string, and a body string. For example, you could write JavaScript code like
fetch('/emails', {
  method: 'POST',
  body: JSON.stringify({
      recipients: 'baz@example.com',
      subject: 'Meeting time',
      body: 'How about we meet tomorrow at 3pm?'
  })
})
.then(response => response.json())
.then(result => {
    // Print result
    console.log(result);
});
PUT /emails/<int:email_id>
The final route that you’ll need is the ability to mark an email as read/unread or as archived/unarchived. To do so, send a PUT request (instead of a GET) request to /emails/<email_id> where email_id is the id of the email you’re trying to modify. For example, JavaScript code like
fetch('/emails/100', {
  method: 'PUT',
  body: JSON.stringify({
      archived: true
  })
})
To check code and implementation please check github project Mail Specification and project done by: CS50 WEB - Mail
ChatGPT was used to improve grammar and coherence of this article
 Commerce